
What is an Indian or Tangent Clinometer?
The Indian Standards Institution (ISI) developed the Indian Pattern Clinometer, also known as the Tangent Clinometer, on 28th December 1970. This handheld instrument measures the height of objects. It finds applications in diverse fields such as geology, forestry, construction, and surveying. The Indian clinometer comprises a sighting mechanism and a graduated scale that empowers users to ascertain the angle of elevation or depression of their line of sight to the inclined surface. Many professionals employ this device in conjunction with a plane table.
This device is valuable for tasks such as measuring the slope of terrains, determining the angle of geological formations, assessing the tilt of trees for forestry purposes, and ensuring proper alignment in construction projects. The clinometer’s compact and portable design makes it easy to carry into the field and gather accurate slope measurements quickly.
What is a Clinometer or Inclinometer?
A clinometer is a tool that utilises a spirit level or bubble level to measure the angles of slopes or elevations in relation to gravity. Depending on the specific model in use, it might include multiple printed scales, enabling measurements of angles up to 90 degrees from the horizontal axis. The spirit level incorporates a needle that indicates whether an angle is ascending or descending relative to the horizontal axis. Continue reading…
How does a Clinometer work?
When the needle of a clinometer aligns with the zero mark, it signifies that the angle with respect to gravity is either level or perpendicular. Additionally, the instrument’s other scale gauges angles in degrees across the range of 0 to 90 degrees, encompassing both above and below the horizontal axis. This feature helps in the determination of the degree of inclination, enabling accurate assessments of steepness. Continue reading…
Parts of an Indian Clinometer
It is composed of the following components:
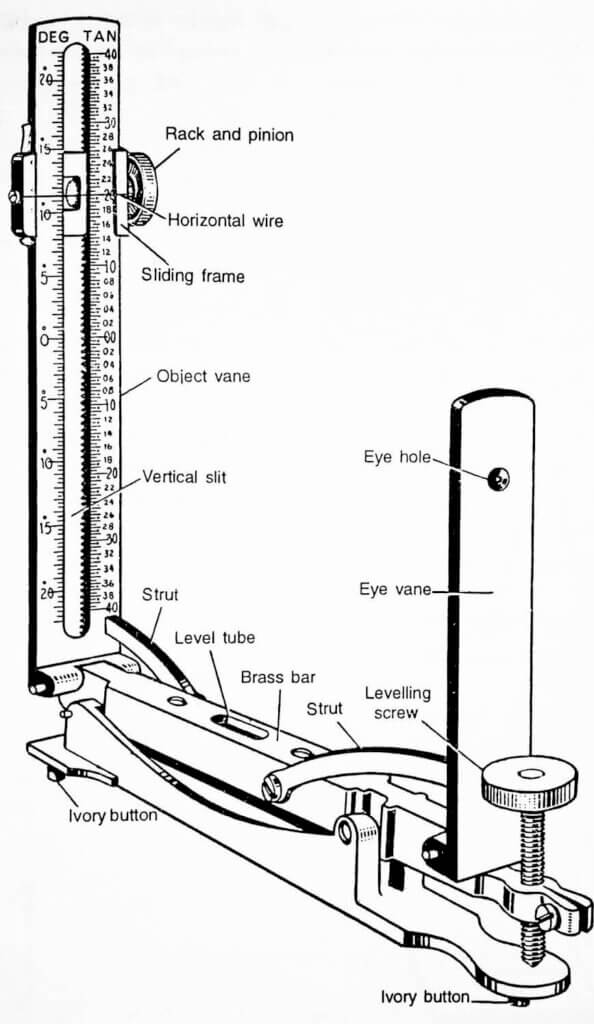

- Base Plate: The clinometer features a sturdy base made from gunmetal, which includes three protruding studs or feet on its underside.
- Carriage: A hollow metal carriage with a square cross-section is situated on the base. This carriage holds a spirit level in place.
- Spirit Level: Within the metal carriage, a spirit level is securely mounted. This spirit level assists in ensuring proper alignment during measurements.
- Pivoting Mechanism: The carriage pivots at one end and attaches to the base. The other end of the carriage has an adjustable screw that is designed to centralize the bubble within the spirit level.
- Levelling Screw: The adjusting screw is employed to align the bubble within the spirit level, thereby achieving accurate readings.
- Folding Side Vanes:
- Eye Vane: The eye vane is a folding element located at one end of the level arm of the clinometer and has a small Eye hole to look through. It is positioned towards the user’s eye while taking measurements.
- Object Vane: The object vane is also a folding component situated at the opposite end of the level arm. It faces the object or point being observed. Like the eye vane, the object vane includes engraved scales with degrees and natural tangents or just natural tangents on both sides. These scales aid in measuring the vertical angle between the line of sight and the horizontal plane towards the observed object.
Measurement of Heights: The height difference is determined through two methods:
- Using Scales: By multiplying the natural tangents with the distance, as measured by a precise scale.
- Height Indicator: Alternatively, the difference in height can be directly obtained using a height indicator.

Specifications as per ISI

- The range of this clinometer is +22° to -22° degrees or +0.4 to -0.4 (tan value in degrees).
- The distance between the extreme graduations of the object vane scale is 164 mm.
- The clinometer is so manufactured that when the vanes are opened and locked with the arms, they are truly at a right angle to the carriage within a tolerance of ± 1/100 degree.
- The adjusting screw has threads of a nominal diameter of 8 mm with a pitch of 0.5 mm and is provided with a large knurled head.
- The bubble is mounted in the hollow middle portion of the carriage and is fixed on one side, the other side being adjustable by means of a screw for occasional adjustments which shall be spring-loaded.
- The graduations on the scale are engraved with clear fine lines and relevant figures.
- The centre of the sighting hole on the object vane is in horizontal alignment with zero of the scale on the object vane. When the bubble is adjusted to a horizontal position, the sighting hole on the side vane and the object vane shall be in a horizontal line.
Least Count: The least count of the Indian clinometer is 20′ (twenty minutes) or 0.005 (value of tan 20′). It is the smallest angle that can be measured using the instrument.

What is the principle behind the working of a Clinometer?
A clinometer, also known as an inclinometer, operates on the principle of measuring the angle of inclination or tilt with respect to the Earth’s gravitational field. It is used to determine the angle of elevation or depression of an object or surface relative to the horizontal plane.

The basic principle behind a clinometer involves using a weighted pendulum or a similar mechanism that responds to the force of gravity. When an individual holds the clinometer in a specific position or attaches it to an object, the pendulum’s position or the mechanism’s movement shows the angle at which the object tilts from the horizontal.
Modern clinometers often use electronic sensors, such as accelerometers or gyroscopes, to measure angular tilt accurately. These sensors detect changes in orientation and provide digital or analogue readings of the angle of inclination.
Measuring the Height using an Indian Clinometer: The Approachable Method
Follow these steps to calculate the Height of a given object using an Indian Clinometer:

Setup and Preparation:
- Find a suitable location with a clear line of sight to the object whose height you want to measure.
- Set up the clinometer on a plane table or stable surface. Make sure it is levelled and not tilted.
Initial Positioning:
- Hold the clinometer at eye level. Ensure that the Eye hole is aligned with the line of sight.
- Aim the clinometer’s sighting notch (horizontal wire or crosshair) at the object whose height you’re measuring. This is typically the lowest point of the object that’s visible.
Reading the Angle:
- Look through the clinometer’s Eye hole or sight and align the object’s base or top edge with the horizontal wire of the Indian clinometer.
- Read the angle indicated on the object vane of the Indian clinometer. This angle represents the angular elevation from your eye level to the object.
Distance Measurement:
- Measure the Distance from the Eye hole to the base of the object using a tape measure or any other suitable measuring tool. Make sure to measure along the same line of sight that you used for the clinometer reading.
Calculating Height:
- Now, use trigonometry to calculate the height of the object.
- Let’s say the distance between the observer and the object is 100 meters and the angle of elevation is 20 degrees. We can use the following formula to calculate the height of the object:
Height(H) = Distance * tan θ + HI
H= Total Height of the Pole; HI= Height from the instrument; HE= Height from the Eyehole
Height = 100 meters * tan(20)
The value of tan (20) as read from the clinometer is 0.36
Hence, Height = 100 meters * 0.36 = 36 meters (+ HI)
Final Result:
The calculated Height will be in the same units as the distance you measured earlier (e.g., meters, feet, etc.). This calculated Height (H) represents the vertical distance from the ground to the top of the object.
Measuring Height Using The Stadia or Unapproachable Method
To measure the height of an object where calculating the horizontal distance from the object to the observing station is not possible, we need to take two observations from Station 1 (S1) and Station 2 (S2).
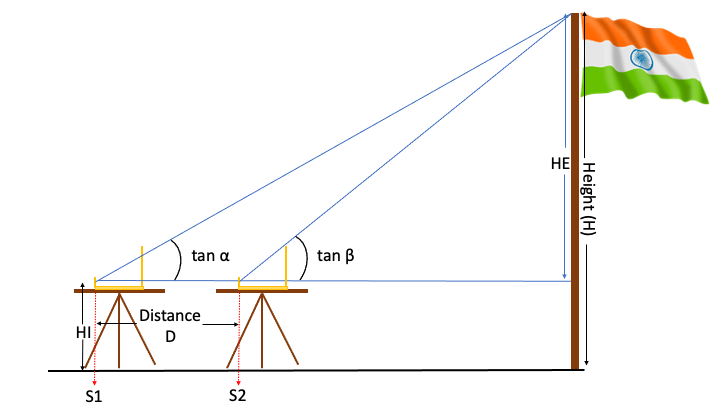
Apply the following formula once you have collected all the readings mentioned in the above figure:
$$Height (H) = \frac{D \times \tan(\alpha) \times \tan(\beta)}{\tan(\beta) – \tan(\alpha)} + HI$$
Where:
- H represents the height of the object from the ground (to be calculated).
- D is the horizontal distance between S1 and S2 (known value).
- α is the angle of inclination at S1.
- β is the angle of inclination at S2.
- HI stands for the height of the instrument (from the Eyehole to the ground)